System 7.0 — released May 13, 19911.0 (1991)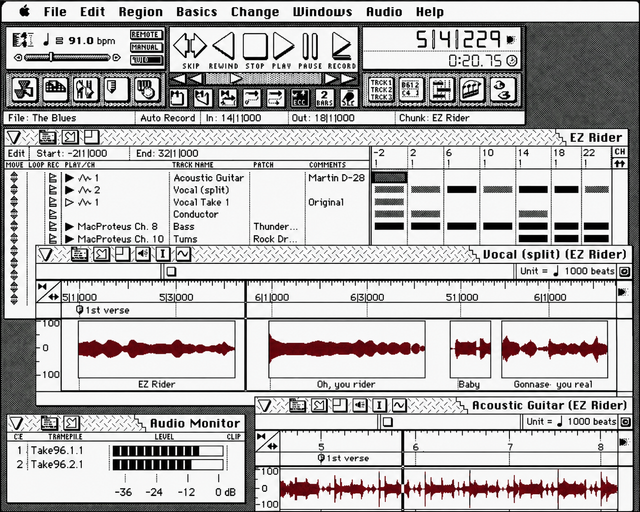 "Taking a broader view, MOTU are working hard to stay at the cutting edge. This has been a busy year, with the company announcing or releasing products which open up new and exciting areas to the Performer user. In addition to Performer 3.5 and the VTP, they recently released a 3 x 15 Video Distribution Amplifier, and announced the forthcoming release of Digital Performer, a hard disk digital recording version of Performer which will support Digidesign's new Sound Accelerator card, "plus several other systems". Your move, Opcode."
 "What a Performer!" Kendall Wrightson, Sound on Sound, Oct 1990
reMarks: Product Newsletter of Mark of the Unicorn, Inc., Number 3, Summer 1991
Digital Performer — A Random Access Revolution
Inspiration strikes! You quickly sequence in a killer drum groove and rockin’ piano part. Then you set up a microphone, plug it into your Macintosh and tear off a lead vocal track that makes Ray Charles drop his Diet Pepsi! No it’s not a dream, it’s Digital Performer® in action.
Digital Performer creates a new frontier for desktop music production by integrating MIDI sequencing and digital audio recording. Digital Performer allows you to simultaneously record and playback multiple tracks of digital audio and MIDI in an integrated, creative environment. Digital Performer’s award-winning sequencer design, combined with random access digital audio provide unprecedented flexibility and control over the music that you make.
Digital Performer allows you to record professional, CD-quality digital audio and sequence MIDI instruments. Digital Performer lets you add guitar solos to your sequences. Create music for advertisements and record the voice-over all with your Macintosh. For many projects, Digital Performer eliminates the need to synchronize to a tape recorder.
In developing Digital Performer, we have integrated audio and MIDI features in a way that complements Performer’s unique user interface—and accommodates those of you who are already familiar with Performer. In fact, because of the random access capabilities, many features in Digital Performer work on audio data in exactly the same way as MIDI data. Parcels of audio data (called soundbites) can be cut, copied, and pasted in exactly the same fashion as MIDI note data. Wherever possible, Digital Performer uses identical displays and commands for both audio and MIDI recording and editing. This creates a seamless environment for creative work.
Digital Performer currently supports the Digidesign Sound Accelerator and Audiomedia hard disk
recording systems, which provide two channels of recording and playback and Pro Tools which offers
4–16 track capability. Digital Performer will easily accommodate future developments in digital multitracking systems.
Working with Digital Performer
Digital Performer records audio in much the same way as a multitrack tape system, but with increased flexibility. You can record an unlimited number of audio tracks with playback dynamically allocated to the available tracks of your hardware. Digital Performer gives you unprecedented flexibility for editing, rearranging and mixing the audio with your MIDI tracks.
Random Access Audio for Fun and Profit
How the Tapeless studio helps make ultra-clean recordings with no waxy build-up!
Digital Performer is designed around digital audio recording systems such as Digidesign’s Sound Tools that record directly onto the hard disk of your computer. These systems are an important advance in functionality over digital systems that record onto tape such as a DAT or F1 format recorder. These new direct-to-disk systems give you Random Access to any portion of your recording.
Random Access Playback
Tape cannot easily provide fast, random access playback because as you record, the tape winds forward in a linear fashion. To get to a section in the middle of the tape, you must rewind or fast forward the tape to the correct position. This takes time and forces you to stop playback while searching.
However, with a hard disk, the read head of the disk drive can access any position on the disk very quickly, much faster than the ear can hear. This allows you to select any portions of the recorded information to be played back in any order seamlessly, without any drop-out in signal or wait between sections.
When using this random access capability, you can record a long passage, say two verses and two choruses, and then either play back the entire recording or create smaller regions of this recording, anything from a single word or drum hit to any measure to one of the choruses. You can create as many of these “regions” as you wish and then play them back in any order, all without affecting the original recording at all! This random access method of playback brings the same flexibility to audio tracks that MIDI sequencers brought to virtual MIDI tracks.
Digital Audio
When digitally recording audio, you are in effect recording the actual audio waveform to a stream of numbers. A digital recorder reduces the audio signal to a formula of amplitude over time. There are two terms that are important to understand when dealing with digital audio recorders, “sampling rate” and “amplitude resolution.”
Amplitude is how loud the signal is at any given time. Professional Digital Audio recorders often use an amplitude resolution of “16 bits,” or 65,536 individual steps. This means that at any instant, the amplitude of the audio source can be recorded with a range of possible values from 0 to 65,535.
The sampling rate determines how many “snapshots” of the amplitude level are taken every second. The professional standard The professional standard of 44.1 kHz sampling rate means that 44,100 recordings of the amplitude level are made every second. To make accurate digital recordings, you need to have a sampling rate that is at least twice the frequency of the highest pitch you wish to record.
The sampling rate determines the highest frequency that can be recorded. The amplitude resolution determines the dynamic range. Together, the 16 bit resolution and 44.1 kHz sampling rate give the necessary fidelity and detail to accurately reproduce sound. These are the standards used for CD-quality digital audio. For more information about digital audio, we suggest the following books:
• Principles of Digital Audio — by Ken Pohlmann
• The Recording Studio Handbook — by John Woram
• Digital Audio Engineering — edited by John Strawn
On-Line Helpful Hints
Performer’s comprehensive On-Line Help provides quick access to on-screen explanations of each feature in the program. On-line help can be a lifesaver during an important session and can help minimize frustration by providing fast answers and information about Performer’s features without interrupting your work.
You can get help on any item in Performer, including menu items, grayed out (unavailable) menu items, mini-menus, windows, and buttons by clicking the item with Performer’s Help cursor.
The Help information in Performer is stored separately in a special file called the Performer Help file. When you install Performer you must also install the Performer Help file in order to be able to get help when running Performer.
Once you have installed the Performer Help file and you are running Performer, you can get help on anything in Performer’s screen with the Help cursor. To turn the arrow cursor into Performer’s Help cursor, hold down the command, option, and shift keys together. When you release the keys, the cursor will turn back into an arrow. On extended keyboards, you can also activate the Help cursor by pressing the Help key.
To get help on something, just click it with the Help cursor. If it’s a menu item, select it from the menu with the Help cursor. When you release the mouse button, a help window will appear that briefly explains the item. To make the help window disappear, click anywhere. All major features in Performer have a help item as well as most smaller features.
Performer’s Help menu contains two selections: About Help and Show Balloons.
Choosing About Help opens a Help window that describes in detail how to use the On-line Help feature.
Choosing Show Balloons makes the arrow cursor turn into the Help cursor without holding down any keys. This is convenient when you would like to browse several features. In Show Balloons mode, any item that you click on or select from a menu will open a help window. Pressing the help key is the same as choosing Show Balloons.
In Show Balloons mode, you can temporarily turn the cursor back into the arrow by holding down the command-option-shift key combination. To permanently turn the cursor back into the arrow, choose Hide Balloons from the Help menu or press the Help key again.
A sampling of the new features.
Recording with Digital Performer produces approximately 5 Megabytes of data per minute of monophonic audio (10 megabytes per minute of stereo). Digital Performer generates 16-bit, 44.1 kHz, mono Sound Designer II files and can load and play back files in Sound Designer, Sound Designer II (Mono and Stereo) and Audio IFF formats.
Soundbites and Soundfiles
A “soundfile” is a file on the hard disk that contains audio data. A “soundbite” is a region within a soundfile or a portion of the soundfile. For example, a soundfile could consist of a recording of an entire song. A region might be a two bar phrase from the second chorus in the middle of the soundfile.
Soundbites (regions) exist within a soundfile. A soundbite is any portion of a soundfile. It can even be the entire soundfile. Soundbites are called “regions” in a Sound Designer II file. For example, a Sound Designer II file has a region list, from which you can build playlists.
A Soundbite is just a pointer to a section of a soundfile, not the actual data itself. This allows you to make edits and changes to a specific Soundbite without affecting the original data. If you trim or delete a Soundbite, you are only changing pointers that indicate how to play a portion of a sound file. This is called “Non-Destructive Editing” as it does not damage the original recording in any way.
Soundbites are edited in the same way as MIDI note data. In addition to top-editing a track line and clicking in the Event List and Graphic Editing windows, Soundbites can be edited by most of Performer’s region editing commands that apply to MIDI note data. These commands include: all Edit menu commands (Undo/Redo, Cut, Copy, Paste, Erase, Repeat, Merge, Snip, Relock, Shift, and Select All), Quantize, Smart Quantize, Deflam, Change Velocity, and Reverse Time also affect soundbites.
The Soundbites Window
As you work with Digital Performer, you’ll create many soundbites. The soundbites window helps you manage them. Think of this window as your “catalog” of audio data. It lists all of the portions of audio that you are working with in the file.
The Soundbites Window shows the exact duration, sampling rate, bits and number of channels for each soundbite, as well as the soundfile from which the soundbite was created. You can sort this list by name, soundfile and size. Digital Performer’s Audible Mode allows you to audition any soundbite directly from this window.
Audio Tracks
Digital audio soundbites are recorded into Audio Tracks. In almost every way, these tracks function in the same way as Performer’s standard tracks which contain MIDI data. You can assign an Audio Track’s playback channel assignment and set its record and play enable status. Performer supports an unlimited number of Audio tracks (within RAM) with playback dynamically allocated among the available hardware channels.
Soundbite events can be viewed and edited in the tracks Overview section just like MIDI data. This window is perfect for arranging sections of your music or changing the form of a composition.
Event Editing for Audio Soundbites
Digital Performer has two event editing windows for more detailed editing of soundbites; Event List and Graphic.
The Event List window provides a playlist style view of the different soundbites as they appear over time. You can pop-edit, placement and volume like a standard MIDI event.
The Graphic Editing window actually shows you a picture of the waveform that makes up the Soundbite. You can freely move soundbites by dragging their pictures forwards or backwards in time. The Graphic Editing window includes a continuous data grid for pan and volume events. This window also allows selection of soundbites for more sophisticated editing such as Split, Trim and Strip Silence. To select a soundbite, double-click on it. It will highlight and an editing box will appear around it.
After a soundbite is selected, you may highlight any region within it to modify its length with the Trim or Split commands.
Trim
The Trim command allows you to select any region of a soundbite and “trim” off the rest of the soundbite. This creates a new soundbite from the original soundbite that is only the portion you selected.
Split
This is similar to trim, however instead of removing the unhighlighted section from the track, it splits the soundbite into multiple soundbites.
Strip Silence
Strip Silence breaks up a soundbite into several smaller soundbites by removing all of the portions that consist of silence. For example, the following soundbite consists of the spoken phrase “Hey! Watch out!”
You could use Strip Silence to remove the silence from between the words and create three separate soundbites.
Volume and Pan for Audio Tracks
Volume and pan events can be created for audio tracks in the same view and edit volume and pan events in both the Graphic and Event List editing windows.
Mono and Stereo Soundbites
Any audio track in Digital Performer can have both Mono and Stereo soundbites. This allows maximum flexibility in handling your digital audio playback assignment.
Zoom
The Time Zoom buttons to the left of the Time Ruler expand and contract time to give you a more global or detailed view of the waveform.
The Audio Monitor Window
The Audio Monitor Window shows the level of Digital Audio playback. The window also doubles as an input monitor for recording new digital audio tracks.
Digital Performer Features
• Unlimited Number of Audio Tracks
• Digital Audio Event List window
• Digital Audio Graphic Editing window
• Soundbites window
• Audio Monitor
• Stereo and Mono Soundbites
• Non-Destructive Editing
• Split
• Trim
• Strip Silence
• Re-load
• Compact
Digital Performer 101: Questions and Answers
Everything you always wanted to know about Digital Performer!
What Hardware do I need?
First, you need a Macintosh SE/30, II, IIx, IIcx, IIci, or IIsi. As of this printing, you can use either the Pro Tools, Sound Tools or Audiomedia systems from Digidesign. You can use any of the Digidesign audio converters such as the AD In, DAT I/O, or PRO I/O. Support for other systems will be available in the future. You will also need a large hard disk, 10 megabytes for every minute of stereo
digital audio you wish to record.
How many tracks can I record?
Digital Performer supports an unlimited number of digital audio tracks. It is important to note however that the hardware that you use to play back the digital audio will present a limitation. The Digidesign Sound Tools and Audiomedia cards support 2 tracks with upgrades to the Pro Tools multi-track systems coming soon. Digital Performer will support more advanced multi-track systems as they become available.
How do I get Digital Performer?
You may purchase the program from any authorized Mark of the Unicorn, Inc. dealer. Registered users of Performer may upgrade directly from Mark of the Unicorn.
What Is a “Soundbite”?
In Digital Performer, a set of pointers to a region in a soundfile—the start of the region and the end of it—is called a soundbite. In a Sound Designer II file, it is called a region. In Digital Performer, we call these regions soundbites because the word region means something entirely different in Performer: it is a period of time within one or more tracks over which an editing command will take effect. Therefore, to avoid confusion with the word region, we use the term soundbite to describe a Sound Designer II file region. They are one and the same.
How Do I Record in Stereo?
Simultaneously record two mono channels and then pan them hard left and right for playback.
What is Non-Destructive Editing?
Almost every operation in Digital Performer that affects audio data is non-destructive, which means that it never alters the audio data that has been recorded onto the hard disk. Instead, when you cut, copy, paste, or use other similar editing commands in Digital Performer, you are actually editing pointers to the original audio data. A pointer is a reference in Digital Performer to a specific location in a soundfile. The soundfile itself is not altered. Non-destructive editing provides immense power and flexibility when handling large audio data files (soundfiles). You can copy and duplicate regions in the soundfile from Digital Performer, but in fact, you are only creating pointers to the original data, which take up virtually no memory or disk space.
What If I Want To Do Destructive Editing?
Destructive editing operations include things like reversing the audio, setting fades, normalizing, changing gain, etc. These operations can be done within Sound Designer II. Digital Performer’s “Edit in Sound Designer II” command provides a convenient way to quickly switch into Sound Designer II to perform destructive editing on a soundbite you have created in Digital Performer.
Can I record a CD into Digital Performer, and then view the music in the Notation Editing window?
This is a very good idea. Unfortunately, the technology to analyze the waveforms, separate the sound out into different instruments, do pitch-to-MIDI conversion so it can be displayed as Notation or Graphic editing events, and do it all fast enough to be usable is still years away. Anyone with good insights on how to accomplish this should send us their resume!Introducing Pro Tools [...] Compatible with [...] Digital Performer" — MIX, Jan 1992
APPLE MACINTOSH: THE AUDIOVIDEO INTERFACE — REP, Mar 1992
DIGIDESIGN PRO TOOLS [...] hardware works with [...] Digital Performer — REP, May 1992
a [...] partnership with fellow software developer Mark of the Unicorn ("Digital Performer" for the Macintosh) has resulted in the release of the YAMAHA CBX-D5 4-track recording system. — REP, May 1992
What's New - 1992 Frankfurt Musik Messe — Electronic Musician, Jun 1992
Mark of the Unicorn became the second Mac software developer to brave the dark, turbulent programming waters, turning Performer into Digital Performer. &
Digidesign Audiomedia II — Electronic Musician, Dec 1992
System 7.1 — released Aug 3, 1992THE 1992 TEC AWARDS NOMINEES: III. OUTSTANDING TECHNICAL ACHIEVEMENT — Mix Magazine, Aug 1992EM GUIDE TO HARD DISK RECORDERS — Electronic Musician, Sep 19921.3 (1993)"At long last, Performer adds digital audio." By Jeff Burger — reviewed in Electronic Musician, Sep 19931.4 (Jul 1993)- all features of Performer 4.2
- general PowerBook compatibility
- MIDI-slave-to-audio operation
- After Dark compatibility
System 7.1.2 — released Mar 1994; first version for Power Macintosh1.41Y (1994) — Yamaha CBX-D5-specific buildThe Yamaha–MOTU agreement lasted only one year; CBX support was subsequently discontinued.
System 7.5 — released Sep 12, 19941.5 (available by May 1995)- QuickTime support
- Digidesign DAE support
1.6 (available by Dec 1995)- Pro Tools III/TDM bus support
- Multitrack and Mixdown windows
- QuickTime 2.0 support
- MIDI Machine Control
- QuickScribe
1.61VERSION 1.61 ENHANCEMENTS
Support for up to 64 tracks of Pro Tools
Users with TDM systems that include more than 16 voices can now use the additional voices.
Running as a “MIDI Only” application
The Basics menu now has a checkable “MIDI only” item. Select MIDI only mode to disable audio functions in Digital Performer. The MIDI Only and Configure Hardware commands are available when no file is open. When MIDI Only is enabled, project folders for New and Existing files are not created.
Improved Audio Patch Thru
Audio Patch Thru now provides two monitor modes on TDM systems. When an audio track is record-enabled, input audio is always patched thru during recording and when stopped. Enable Audio Patch Thru (the headphone icon button in the Audio Monitor window title bar) to control whether Audio Patch Thru also occurs during playback. Note that when Audio Patch Thru is enabled, soundbites in record-enabled tracks are not played back.
Mono versus stereo monitoring
On non-TDM systems (original ProTools, Session 8, and Audiomedia II), the Audio Monitor mini-menu has two new checkable monitor modes: Mono Monitoring and Stereo Monitoring. This controls whether inputs are patched thru directly to the corresponding output or mixed to the output pair.
1.62ß (available by Feb 24, 1996)VERSION 1.62ß ENHANCEMENTS
Session 8 support
Digital Performer, along with the latest version of the DAE, supports up to 50 virtual audio tracks, audio scrubbing, 4 virtual EQ's (1 per track), and audio controller automation with the Session 8 hardware.
☛ Please note that Digidesign calls the Session 8 hardware “Project” in the DAE’s Hardware Configuration dialog box.
☛ Using a large number of virtual tracks or a smaller number of virtual tracks with denser automation data on Session 8 systems will cause DAE -9155 errors. This is a result of the performance limits of the Session 8 card itself.
Bridge I/O support
Digital Performer now supports all of the audio inputs and outputs that may be made available by installed Bridge I/O cards.
SampleCell TDM support
The SampleCell TDM outputs can now be routed to Digital Performer as inputs to an audio track.
Nudging with the arrow keys
Just select some data in the MIDI or Audio Graphic Editing window and type the left or right arrow keys on your Mac keyboard to nudge the data forward or backward in time. The Nudge amount varies with the current Zoom level if Edit Resolution is disabled and equals the Edit Resolution value if Edit Resolution is enabled.
Preference for disabling Disk I/O alerts
On expanded TDM systems with more than one Disk I/O card, soundbites from soundfiles that reside on a hard disk connected to a specific Disk I/O card can only play back on audio voices specific to that Disk I/O card. Whenever Digital Performer notes a hard disk/voice conflict, it produces a warning alert. There is a new preference in the Preferences dialog box that allows you to disable this warning alert. Soundbites that cannot playback due to these conflicts appear with X's in their display in the audio graphic editing window.
System 7.5.3 — released May 1, 19961.7 (1996)"They said it couldn’t be done." (Electronic Musician Jul 1996)"Perfect Pitch from MOTU" (Sound on Sound Aug 1996)"Audio Magic" (Sound on Sound Sep 1996)Audio hardware requirements
Digital Performer supports the following Digidesign audio cards:
■ Audiomedia I and II
■ Audiomedia LC
■ Sound Tools II
■ Pro Tools (4-16 channels)
■ Pro Tools Project (formerly called Session 8 )
■ Pro Tools III (16-48 channels)
Refer to Digidesign for information about the compatibility of the hard disk(s) you plan to use with the Digidesign Audio Engine (DAE) and their audio hardware.
Some of these audio cards may not be supported in future versions of DAE. Please check with Digidesign for the latest information regarding future compatibility.
Macintosh requirements
Digital Performer will run on any Macintosh that is compatible with the Digidesign audio cards listed in the previous section. Please contact Digidesign about the compatibility of these audio cards with specific Macintosh models. A PowerPC Macintosh is recommended for faster DSP processing.
System software requirements
Digital Performer requires System 7.0 or higher with 32-bit memory addressing enabled. If your Mac is not 32-bit clean, the Digital Performer installer will automatically install MODE32 or the 32-bit Enabler, whichever is correct for your Mac model. However, you must still enable 32-bit addressing manually after running the installer.
RAM requirements
Digital Performer requires a minimum of 16 megabytes (Mb) of RAM, but this configuration may require you to lower Digital Performer’s default memory partition or strip your system of extensions, control panels and fonts. More RAM is recommended. If you have System 7.5 or higher, you will probably need at least 20 Mb of RAM because of the size of System 7.5.
VERSION 1.7 ENHANCEMENTS
PureDSP™ Pitch Shifting, Time-Scaling, and Gender-bending
These features are covered in detail in other chapters of this booklet.
Improved Scale Time command
See Figure 5-1 on page 19 for details.
Improved menu organization
See Figure 8-1 below for a summary of changes that have been made to Digital Performer’s menu commands. Several old commands have been moved, and a host of new ones added.
Commands that have to do with configuring your audio hardware have been moved to the Basics menu, which, in general, contains other commands for configuring and customizing Digital Performer.
Audio windows have been moved, sensibly, to the Windows menu, which has been alphabetized to make it easier to find the window you are looking for.
Several new commands have been added to the Audio menu, including the new Spectral Effects command and several commands for managing audio tempos.
Soundbites Window enhancements
As shown in Figure 2-2 on page 10, the Soundbites window has several new features, which are summarized in the next few sections.
More, configurable columns
The Soundbites window now has more columns. Since you may not always be interested in seeing all of them, you may now choose which columns to view. The Columns Setup mini-menu command works just like the same command in the Tracks window (short-cut: double-click or option-click the label at the top of one of the columns). Also, you may rearrange the columns (as in the Tracks window) by dragging the label at the top of a column to the left or right. Digital Performer saves your customized column arrangement in the Digital Performer preferences file (in the Preferences Folder in the System Folder), so it is remembered in all of your Digital Performer files.
New Columns
The QUARTER|TICKS column shows the length of the soundbite in quarter notes and ticks. If the soundbite doesn’t have a tempo map, this column will be empty.
The TEMPO column shows the tempo of the soundbite if it has a tempo map. If the tempo of the soundbite varies, the average tempo is shown (labeled “avg.”) If the soundbite doesn’t have a tempo map, this column will be empty.
In previous versions of Digital Performer, the FILE column could show either the full path name of the soundfile, or just the file name. Now, this column always shows just the filename. If you need to know the full path name, you can see it in the status area (see the section on the status area, below).
The DISK column shows the name of the disk on which the soundfile resides.
The DSP column shows the DSP Preferences for the soundbite. You may choose independently for each soundbite how it should be transposed (if at all), and also whether it should ever be time-scaled. See the section on the status area, below, to find out how to set these preferences.
Sorting soundbites
The Sort command in the mini-menu can now sort the soundbites according to any column. Also, as described in the Guide to Digital Audio, sorting does not affect the order of soundbites that have the same value for the column you are sorting on, so you may find it useful to sort first by one column and then by another. For instance, if you first Sort by File and then Sort by Disk, the soundbites will now be arranged primarily by disk, but within each disk they will be sorted by file name.
Status Area
The new status area at the top of the Soundbites window gives you information about the selected soundbite or soundbites. It also allows you to set the DSP Preferences for the selected soundbites. (See “soundbite preferences for DSP” on page 11 for more information.)
The status area is the only place you can see the full path name of a soundbite’s soundfile. It also gives a more detailed description of a soundbite’s tempo map (minimum, maximum, and average tempo) than the tempo column does. You may find it best to keep the DISK, TEMPO, and DSP columns hidden most of the time, since that information is all available in the status area.
Save As Digital Performer 1.6
The Save As command now allows you to save a file so that it may be opened by Digital Performer 1.6, 1.61, or 1.62.
New sync remote controls
There are three new remotes in the Remote Controls window:
■ Turn Slave to External Sync on or off
■ Turn MIDI Machine Control on or off
■ Turn FreeMIDI Sync on or off
MIDI Patch-thru in the background
A new checkbox in the Patch Thru dialog allows you to enable Digital Performer to patch thru even when another application is in front. For this to work, you must make sure the FreeMIDI applications only mode is enabled in FreeMIDI Setup’s Preferences.
1.71 (updater build dated Jun 6–7, 1996)- AudioMedia III support
- Pro Tools Project PCI support
- Pro Tools III PCI support — all three systems were presented at the 100th AES Convention in Copenhagen, May 11–14, 1996
Digital Performer supports Digidesign's family of digital-audio cards, but it does not support Sound Manager-based software-only audio. [...] Wh en it comes to altering audio rather than converting it, Digital Performer is the hands-down winner. Its TrueDSP technology transposes audio without introducing the Chipmunks-like artifacts that plague other audio programs. [...] The Spectral Effects command also includes a series of presets that enable you to turn sopranos into altos, for example. The results are astonishing. [...] Mark of the Unicorn has packaged this DSP power in one of the most exquisitely functional dialog boxes I've ever seen (see "Shift That Pitch"). [...] Digital Performer can crunch an audio track in the background, even while you play and record additional tracks. A Background Processing window provides status reports and lets you pause, cancel, and reorganize tracks waiting to be processed[/list]

 Author
Topic: Digital Performer Timeline (Read 197 times)
Author
Topic: Digital Performer Timeline (Read 197 times)
