 NETWORKING WITH THE OPCODE STUDIO 5
 You may connect more than one Studio 5
to a Macintosh. This is called networking.
You can connect up to six Studio 5’s to a
single Macintosh for a maximum of 1,440
MIDI channels.
ATTENTION!
if the images arent loading there is a duplicate of this article here:
http://www.oldschooldaw.com/forums/index.php?topic=27.0it wont make much sense to you without the pictures
NETWORKING BASICSA network is defined as the connection of
one or more Studio 5’s to a Macintosh
serial port. The Macintosh has two serial
ports so it can support two networks. You
can connect up to six Studio 5’s to a single
Macintosh (two networks of three
Studio 5’s)

When networking Studio 5’s, always con-
nect the “B” port of the first Studio 5 to
the “A” port of the next Studio 5 (as
shown in Figure 7.1)
Studio 5 NumberingWhen you turn on a Studio 5, it displays a
number in the middle of its display for
about one second before it displays the
current patch number. This is indicates
Studio 5 unit number. Any Studio 5 con-
nected directly to the Macintosh is
number 1. The Studio 5 networked to it is
number 2, and the Studio 5 furthest from
the Macintosh is number 3. Figure 7.2
illustrates Studio 5 numbering
 Changing Studio 5 Patches
When you change patches on one
Studio 5, the patches change on all
Studio 5’s in the network. Each Studio 5
contains the patches defined by your cur-
rent Patch document
Studio Setup DocumentsEach Studio 5 has its own icon in the
Studio Setup document. If you have two
Studio 5’s, you’ll see two Studio 5 icons;
four Studio 5’s will produce four icons,
and so on. The names of the icons depend
on how you’ve connected the Studio 5’s to
the Macintosh.
NETWORKING OPTIONSThere are numerous ways to connect mul-
tiple Studio 5’s. The following sections
discuss your networking options
One Network/One CableThe first option is to connect all Studio 5’s
in a single network as shown in
Figure 7.3. You can connect no more than
three Studio 5’s in this fashion. The one
network/one cable connection gives you
the advantage of leaving a Macintosh
serial port free while still accessing up to
720 MIDI channels

Each Studio 5 has its own icon in the
Studio Setup document. The icon contains
the name of the serial port and the
number of the Studio 5. The network
shown in Figure 7.3 produces three
Studio 5 icons in the Studio Setup shown
in Figure 7.4
 One Network/Two Cables, 4
Studio 5’sThe second option is to connect all
Studio 5’s in a single network and connect
a second cable between the last Studio 5’s
“B” port and the unused Macintosh serial
port as shown in Figure 7.5. You can connect
no more than four Studio 5’s in this
fashion. This helps balance the MIDI data
stream between the two Mac serial ports
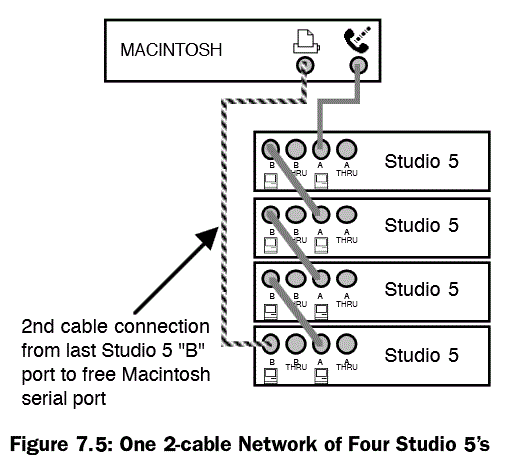
If you have four Studio 5’s in a 2-cable net-
work as seen in Figure 7.5, MIDI data
distribution occurs as follows:
- The Studio 5 connected directly to
the modem port will communicate
exclusively over that port - The Studio 5 connected directly to
the printer port will communicate
exclusively over that port - Studio 5 #2 communicates through
Studio 5 #1. Studio 5 #3 communi-
cates through Studio 5 #4
Each Studio 5 has its own icon in the
Studio Setup document. The icon indi-
cates the number of the Studio 5 and the
fact that it’s part of a 2-cable connection.
The network shown in Figure 7.5
produces four Studio 5 icons as shown in
Figure 7.6
 One Network/Two Cables, 3 Studio 5’s
If you have three Studio 5’s in a 2-cable
network, MIDI data distribution occurs as
follows:
- The Studio 5 connected directly to
the modem port will communicate
exclusively over that port - The Studio 5 connected directly to
the printer port will communicate
exclusively over that port - The middle Studio 5 sends all of its
internally generated data (time code,
footswitches and foot controller info,
and Audio In note events) to the “B”
port connection and all other MIDI
data to the “A” port
One Network/Two Cables, 2 Studio 5’sIf you have two Studio 5’s in a 2-cable net-
work, then each Studio 5 communicates
exclusively with the Macintosh port to
which it is directly connected
Two NetworksYour final networking option is to split
your Studio 5’s between both Macintosh
serial ports as shown in Figure 7.8. You
can connect up to three Studio 5’s on
either network. Using two networks gives
you complete control over which MIDI
data goes to which Macintosh serial port
You must use two networks if you have
more than four Studio 5’s connected to a
Macintosh

In this instance, each Studio 5 has its own
icon in the Studio Setup document. The
icon contains the name of the serial port
and the number of the Studio 5. The con-
nection shown in Figure 7.7 produces
three Studio 5 icons as shown in
Figure 7.8.
 THE STUDIO 5 MENU WITH
NETWORKSCHAPTER 7: Networking
Studio 5 Manual
43
THE STUDIO 5 MENU WITH
NETWORKS
Any time the current Studio Setup docu-
ment contains more than one Studio 5,
you’ll see them listed at the bottom of the
Studio 5 menu
.
To select (check) a Studio 5, simply
choose it from the menu

The following sections discuss how each
Studio 5 menu item behaves when more
than one Studio 5 is present in a Studio
Setup document. See
Chapter 8: Studio 5
Menu
for a description of each menu item.
In general, you must select a Studio 5
before choosing a Studio 5 menu com-
mand. Windows that are already open
continue to work with the Studio 5 that
was selected when they were opened.
SMPTE ReaderThe SMPTE Reader displays the time
code received at the SMPTE IN jack of
the selected Studio 5. If you’re using mul-
tiple Studio 5’s, you must select a Studio 5
before
opening the SMPTE Reader
window
Stripe SMPTE WindowsThe Stripe SMPTE Window works with
the selected Studio 5. If you’re using mul-
tiple Studio 5’s, you must select a Studio 5
before
opening the Stripe SMPTE window
Audio InThis toggles the Audio In feature ON or
OFF for the selected Studio 5
Foot Controller InThis enables or disables the Foot Control-
ler for the selected Studio 5
Compatibility SetupThis command opens the Compatibility
Setup Window, which recognizes
all
Studio 5’s in the setup document. If you’re
using multiple Studio 5’s, it doesn’t matter
which Studio 5 is selected when you open
the Compatibility Setup Window
NOTE: If you use two Studio 5’s to emulate
four MIDI Time Pieces, you should use both
Macintosh serial ports. This gives you
access to 17 MTP cables on each portDisplay ROM VersionThis command displays the ROM Version
for the selected Studio 5
Fast Mode Communication SpeedThis command dictates communication
speeds between the
Macintosh
and any
Studio 5’s that are connected directly to it.
Communication between Studio 5’s in a
network is always at a speed of 8 x MIDI
Re-Establish CommunicationThis command re-establishes communi-
cation with all Studio 5’s regardless of
which is selected
SIMPLE NETWORK EXAMPLE:
TWO STUDIO 5’SYou can network two Studio 5’s to a single
Macintosh using any of the methods dis-
cussed previously
One Network/One Cable ExampleFigure 7.10 shows a single network of two
Studio 5’s. The Macintosh modem port
connects to the first Studio 5’s “A” port
 Choose File>New Studio Setup and search the Macintosh modem port
Your new Studio Setup document contains an icon for each Studio 5 in your network (see Figure 7.11)
 Add devices to your Studio Setup document and connect them to Studio 5 icons to reflect the current
conditions in your studio One Network/Two Cable Example
You could add an additional cable
between the second Studio 5’s “B” port
and the Macintosh printer port (as shown
in Figure 7.13)

Connecting the Macintosh printer port to
the second Studio 5 increases MIDI
throughput capabilities by balancing the
MIDI data load between the two Macin-
tosh serial ports. Studio 5 #1
communicates with the modem port and
Studio 5 #2 communicates with the
printer port.
Two Network ExampleFigure 7.14 illustrates another possible
way to connect two Studio 5’s to the Mac-
intosh. In this connection, all
communication with the top Studio 5 is
handled by the printer port, and all com-
munication with the bottom Studio 5 is
handled by the modem port.
 Which Setup is Best?
The only real advantage of the “one net-
work/one cable” setup is that it leaves
you a free Macintosh serial port.
The advantages and disadvantages of the
“one network/two cables” and “two net-
work” options are more subtle. Each
Studio 5 can communicate directly with
46 Opcode Systems, Inc.
the computer without having to go “thru”
the other Studio 5. However, if you are
using a Studio Patch and want to route
data from a device on one Studio 5 to a
device on the other Studio 5, the one net-
work/two cable setup is more efficient
because data can travel directly between
the two Studio 5’s. In the two network
setup, data must go from one Studio 5 to
the Macintosh and then to the other
Studio 5. In addition, the Macintosh will
only know that it must thru the data from
one serial port to another when OMS is
active. This means you cannot use this
type of patch with a two network setup
without the Macintosh being present.
With a one network/two cable setup, the
routing will work even if the Macintosh is
not present


 Topic: Networking with the Opcode Studio 5 (Read 11528 times)