Author Topic: MDD silencing effort  (Read 25337 times)

Offline urdvurk

  • Enthusiast Member
  • ***
  • Posts: 25
  • new to the forums
Re: MDD silencing effort
« Reply #20 on: October 19, 2016, 04:13:38 PM »
Continuing: to fit the aluminium heatsink I took a wood router to it. I'd read somewhere that wood routers can also be used for aluminium, so I decided to simply give it a go.

Before:


and after:


Slightly wobbly surfaces and an error in the top edge, but otherwise quite acceptable I think. So in it went, and out came most of the foam:


It turns out I did have to add another layer of foam to get a snug fit onto the heatsink, but with that it fit perfectly. This is looking in through the new hole in the side of the case, and through the exhaust fan, at the heatsink:


So, did it work as well as the copper heatsink? Well, no.


Left line is the copper heatsink, right line the aluminium one. Spikes are stress runs and/or me opening the case to poke around, the dip at the end is enabling nap mode. In the end, what made the biggest difference was removing the side panel, which enabled the case exhaust fan to work that much better. It's weird, on the Quicksilver it seems quite able to blow out hot air that way, even with the panel in place, but on the MDD temps drop by 5 degrees when I remove the panel. Needless to say it stays off for now, and I'm on the hook for one of these.

I have since experimented some more with various configurations of heatsink and fans, and to the great surprise of probably no-one at all it turns out that both MacTron and DieHard were completely correct: you need to get hot air out of the case, and the copper heatsink works better than the aluminium one.

I've ended up with running the CPU fan off the original logic board connector. If you can keep temperatures below 57 degrees the fan will always run at its lowest speed, and you get the benefit of temperature control. Even in OS 9 it isn't that bad; the fan will typically run at 8-9 V, which is around the voltage at which I would be running it anyway. The case fan now runs at a very low speed, maybe 6 V. Idle temperature is around 54 degrees, and under load it will rise to slightly over 56. This is with the aluminium heatsink, because of the neater interior, the copper heatsink will take off around 2 degrees. I'm quite happy with it like this, it is now closer again to being as quiet as the QS. The loudest is now the PSU fan, so I'll try to get that to spin lower. I've thought of maybe thermally connecting the heatsinks inside the PSU to its casing, so heat can flow away that way, which in turn should make the fan spin slower.

The copper heatsink will probably find its way into the FW800, along with the dual 1 GHz processors, to try a minimum-effort quieting mod: replacement PSU and CPU fans, nothing else.

Offline geforceg4

  • Platinum Member
  • *****
  • Posts: 535
  • i did my time on mac os 9
Re: MDD silencing effort
« Reply #21 on: October 20, 2016, 05:19:24 PM »
i havent had time to read this entire thread..
does anyone want to give a quick synopsis here? whats been accomplished? lower heat? lower noise? all of the above?
im interested to see the 120mm fan in place of the duals by the power supply..behind the speaker..
i guess i will have to read the thread to find out exactly how this was accomplished!

Offline urdvurk

  • Enthusiast Member
  • ***
  • Posts: 25
  • new to the forums
Re: MDD silencing effort
« Reply #22 on: November 08, 2016, 02:57:25 AM »
I'll do a summary next, but the short version is that both temperatures and noise are down compared to stock.

First however there is the side panel that needed some holes to facilitate the removal of hot air from the case. Going by 
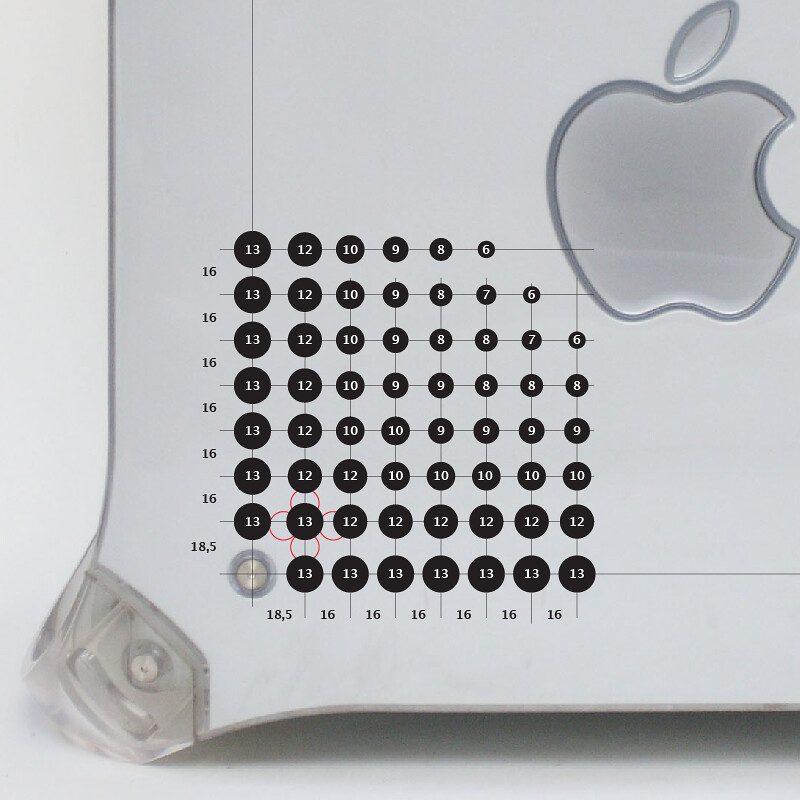
this example I thought basically any holes at all would go a long way towards solving the problem of heat buildup in the case. I came up with a design that I thought would work:


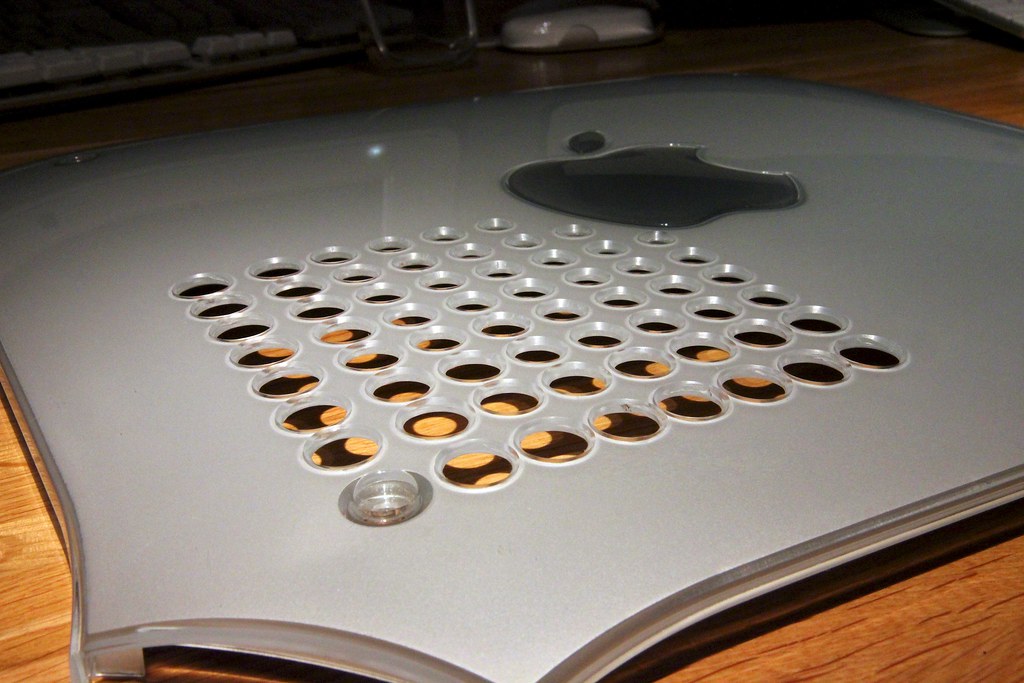
To test, I took an old scuffed side panel and started to drill some holes in it. I tried it, but straight away it became clear that just a few holes were not going to cut it: temperatures went up to almost what they were with a closed side panel. So, I drilled some more holes in my test panel:


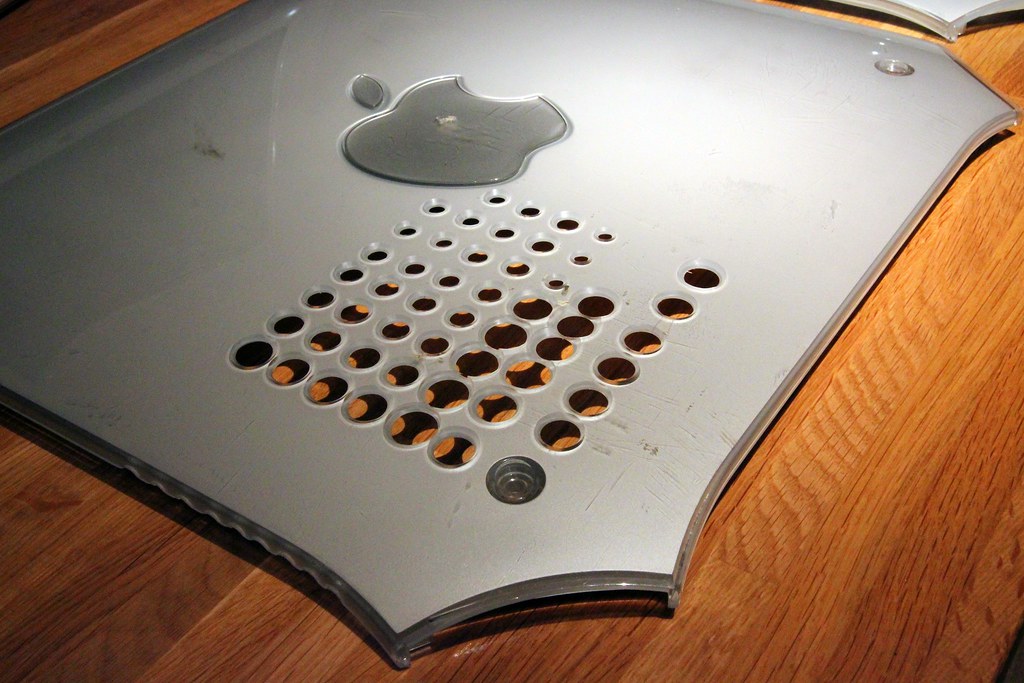
It doesn't look like much, but the total surface area of the holes is about the same as in my design, so it should be good to test. As a side note, the panel is very easy to work on, as can be seen from the tiny threads of material left between the holes on the second row from the bottom. Polycarbonate is quite elastic, and does not break or crack easily.

There was a clear improvement, with temperatures only going up 3-4 degrees compared to with the side panel off:


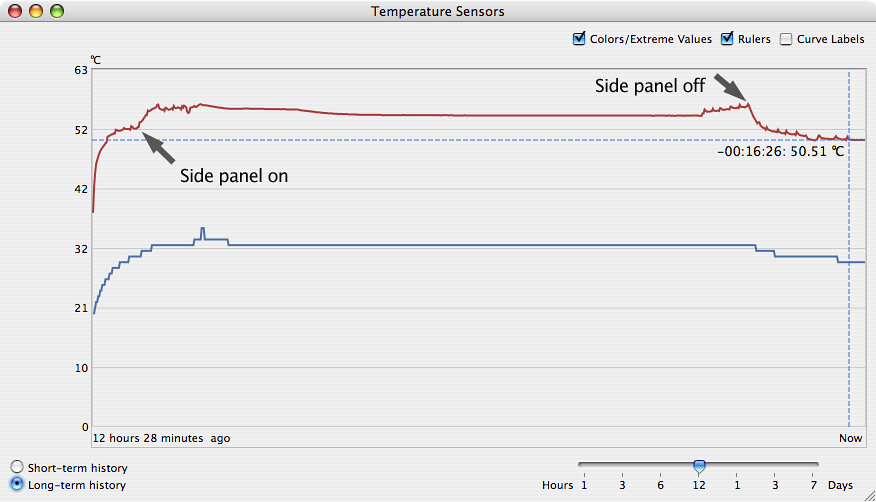
To clarify: I started up the system and did some stress tests, during which I put on the side panel. Temperatures go up straight away as you can see. Then, after leaving it on overnight, I did some more stress tests, during which I took the side panel off again, resulting in temperatures dropping again.

Clearly, more holes are better, so first I enlarged the hole I cut in the side of the case:


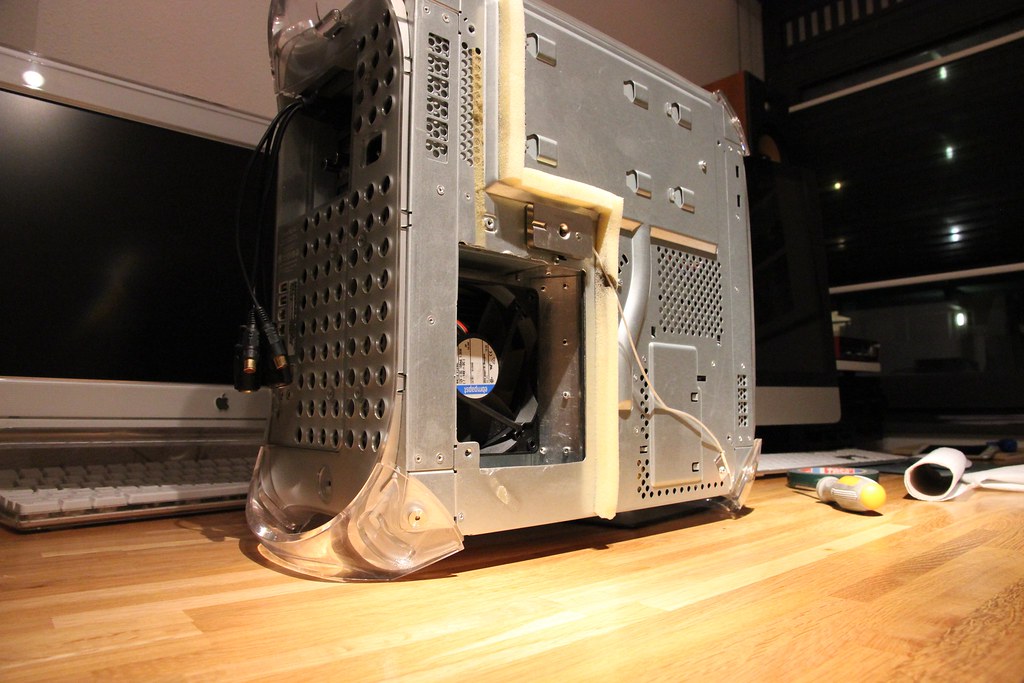
...and also stuck the wifi antenna out of the way. Then, I added another row of holes to the design, and increased the diameter of all of them by 1 mm:


This increased the total surface area by 39%, which I hoped would be enough. After a few hours of careful drilling, I ended up with this:


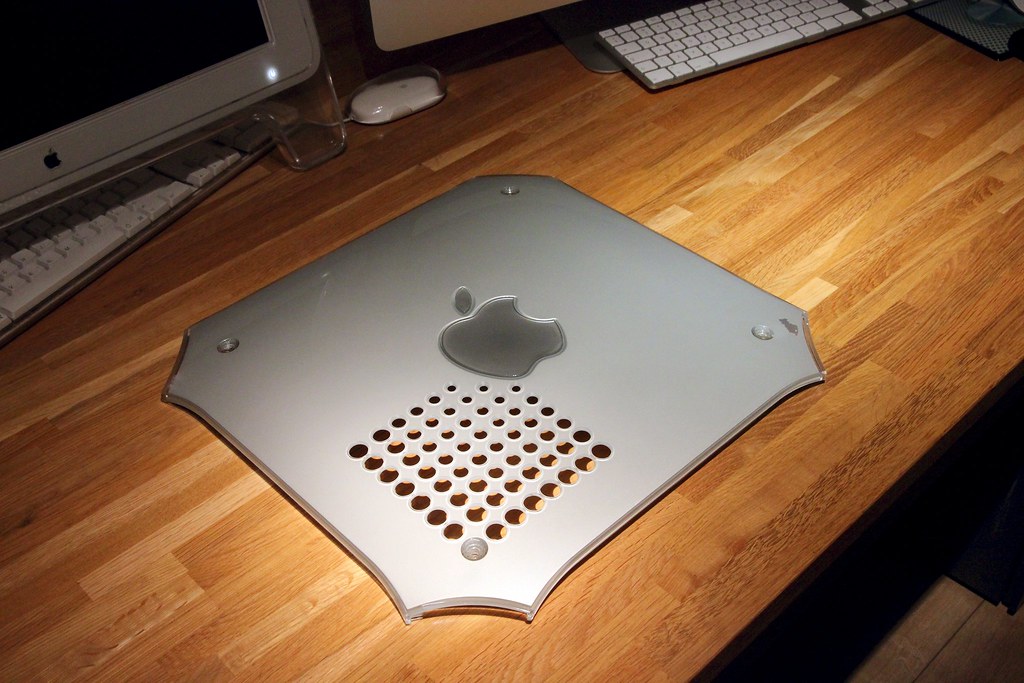
Given that most of it was done with an electric hand drill, I'm not too unhappy with the result:


One more, with the panel in place:


So did it work? Thankfully, yes it did. After some more fiddling with cable routing, temperatures are now between 53 and 55 degrees, so not as low as without the side panel, but low enough for me. I expect they will drop some more over time as the thermal compound sets or cures or whatever.

Offline urdvurk

  • Enthusiast Member
  • ***
  • Posts: 25
  • new to the forums
Re: MDD silencing effort
« Reply #23 on: November 08, 2016, 03:47:33 AM »
To summarize: my MDD is now whisper-quiet:


This is taken at ear position, with the MDD sitting on the desk next to the keyboard, just visible in the background. I had to take that reading late at night, as during the day background noise would get in the way.

It also runs cooler than stock, below 55 degrees even under full load. This means that the central CPU fan is always spinning at 5 V. At the same time, it has gone from dual 1 GHz to dual 1.42 GHz processors, so it is much faster now as well.

To get here, I replaced the dual PSU fans by one 120 mm fan. I cut part of the PSU housing:

[

...and made a thing out of aluminium sheet that holds the fan:


...which slides over the PSU housing and slots into the old fan mounting holes:


In the center of the case, I replaced the big CPU fan with a 140 mm fan that blows air directly at the heatsink. This gets air from the front of the case, which I have separated as much as possible from the rest of the case, to prevent hot air being circulated. In addition, I have added a 120 mm case fan to the side of the case that sucks air straight from the heatsink and out. To do this I made a fan holder, a large hole in the side of the case, and a fan grille in the side panel.

The inside of the case now looks like this:


Everything slots straight in and is held in place by the DVD cage and the black processor board support. The heatsink fits exactly onto the foam lining, so the case fan only gets hot air from the heatsink.

As a final note, it turns out that airflow below the heatsink is important as well. After rerouting a few fan wires below the heatsink bracket, right up to the ports in the back of the case, I noticed that processor temperatures were up by a degree or two. I couldn't figure it out, the heatsink was in its proper place, the wires were not even completely blocking airflow there. Still, rerouting the wires to elsewhere lowered temperatures again. So: airflow, any airflow, around the heatsink is important. Big surprise there.

This is what it looks like from the outside:


...except it is now under the desk, and has cables coming out the back so it actually works. Still, as MDDs go, I'm quite happy with it.
« Last Edit: November 08, 2016, 04:00:44 AM by urdvurk »

Offline dr bu

  • Gold Member
  • *****
  • Posts: 230
  • inconsistent soul
Re: MDD silencing effort
« Reply #24 on: November 08, 2016, 04:22:17 AM »
Looks beatiful.✌
djupsinnig

Offline DieHard

  • Global Moderator
  • Platinum Member
  • *****
  • Posts: 2366
Re: MDD silencing effort
« Reply #25 on: November 08, 2016, 07:50:06 AM »
Love the outside pic :)

Offline ELN

  • Gold Member
  • *****
  • Posts: 295
  • new to the forums
Re: MDD silencing effort
« Reply #26 on: June 12, 2017, 12:27:56 AM »
urdvurk, could you please post the design for your power supply fan mount, for the record?

Offline FdB

  • Moderator
  • Platinum Member
  • *****
  • Posts: 666
  • And then...
Re: MDD silencing effort
« Reply #27 on: June 12, 2017, 11:00:40 AM »
Urdvurk, looks great!
This Must Be The Place

Offline 1@n

  • Valued Member
  • **
  • Posts: 10
  • new to the forums
Re: MDD silencing effort
« Reply #28 on: June 20, 2017, 02:00:49 PM »
A few years ago, after reading some sound experiments by a person named Charles Altman, I made custom wooden (mostly pine) boxes for some guitar amps, pa speakers and a bass amp.  One unexpected benefit from the reboxing was that they were all way quieter than before.  The wood absorbs and nullifies a lot of vibration.  A lot of the sound was coming off of the plastic covering the speakers had before.  Sound only comes off a final surface, it doesn't come from the middle of something.  And whatever that final surface is made of will piggyback the waves coming off a surface, like surfing.  I don't doubt that there would be a big benefit to reboxing a Mac, just don't varathane it when you're finished.  The Mac case is acting like a big, ugly resonator - plastic has horrible harmonics.  Even sitting the Mac on some pine might help.  It's important to test the pine when you buy it by hitting it and getting pieces that have pleasing harmonics.
Signatures are displayed at the bottom of each post or personal message. BBCode and smileys may be used in your signature.

Offline torvan

  • Veteran Member
  • ****
  • Posts: 138
  • Old School
Re: MDD silencing effort
« Reply #29 on: June 29, 2017, 10:43:34 PM »
Love the holes in the side of the case. I would love to have a template that I could apply to the side and drill it. I am not exactly handy with a lot of modifications (I refuse to use the popular term "hack") because I am a bit clumsy, but I have a couple test side panels from a "way beyond dead" Quicksilver.

I have recently added Noctua fans to it in order to cool and silence it more. I replaced the main fan with a same sized Noctua using 4 pin to Molex connectors they provide. I used two more smaller Noctuas (same size as original ones) with the same connector for the power supply.  The fans are fairly quiet at full speed, but I have no temp monitors to measure the resulting heat in the G4 MDD Dual 1.25. I am only running 9.2.2 at the moment, but will install Tiger here soon.

I also replaced the drives with a SATA controller and two 500GB SATA 3.5" drives. I would pull in the SSD drives I have, but these two were sitting there in the tech closet looking lonely..... So I never hear any real HDD sound anymore, and they are resting comfortably in the space where the second CD/DVD would normally sit. Plus side of that location--I can change them out without opening the case (in theory).

But I would love to add another fan to the machine, just to get some of that hot air out of it given the G4 heat issue and the poor cooling this design has.


15 Macs (13 of them ranging from an SE to a MDD), 2 iPads, 2 iPhones, 1 Hackintosh. Small house getting smaller with each Mac. . . . .  .Husband shakes his head but supports my habit.

Offline DieHard

  • Global Moderator
  • Platinum Member
  • *****
  • Posts: 2366
Re: MDD silencing effort
« Reply #30 on: July 01, 2017, 10:21:04 AM »
This is still... by far... the coolest (pardon the pun) MDD Modification ever done :)

Offline IIO

  • Platinum Member
  • *****
  • Posts: 4439
  • just a number
Re: MDD silencing effort
« Reply #31 on: July 03, 2017, 07:50:08 AM »
i have one of those in the dual 1,25, works okay but you can not really file that under "silencing".

it originally was some USD 200+ so you wouldnt buy one new today.

i have yet to move one of my G4s into a 6 HE 19" rack mount case with lots of space to put the components far from each other, eventually with the PSU outside the case, and only one big fan over the processors.

insert arbitrary signature here

Offline urdvurk

  • Enthusiast Member
  • ***
  • Posts: 25
  • new to the forums
Re: MDD silencing effort
« Reply #32 on: November 06, 2017, 02:35:15 AM »
Hi all,

I have been meaning to reply here but had not yet gotten around to it, sorry. Thanks for the compliments!

urdvurk, could you please post the design for your power supply fan mount, for the record?

My original squiggles would not be very useful I suspect, I mostly just made stuff up as I went along. However I have made a quick drawing of the end result, with all the relevant measurements:


Left is the top and bottom part, to the right the connecting part. You could cut the whole thing out of a larger piece of sheet, but this way the top and bottom parts can be made exactly the same so it fits better. If I were to do it again I wouldn't bother with the sliding pins and just fix it into place some other way. This means that the indicated room to slide the thing into place is optional. From memory it is around 5 mm, so the step in the left edge of the part would move down by that much (the 18 mm dimension would become 23 mm, 20 mm would become 15).

I would love to have a template that I could apply to the side and drill it. I am not exactly handy with a lot of modifications (I refuse to use the popular term "hack") because I am a bit clumsy, but I have a couple test side panels from a "way beyond dead" Quicksilver.

The pattern with measurements is a couple of posts up, but I could make a pdf if you want it. You get the best results using a pillar drill and one of these:


...which will allow you to drill lines and grids of holes much more precisely. I had to use a hand drill on many holes, and it's much more difficult and inaccurate.

Anyway, hope this helps.

Offline mrhappy

  • Platinum Member
  • *****
  • Posts: 1152
  • new to the forums
Re: MDD silencing effort
« Reply #33 on: November 06, 2017, 09:48:05 AM »
Thanks for the info Urd!! I'm sure some people will make use out of this! ;D ;D

Offline DieHard

  • Global Moderator
  • Platinum Member
  • *****
  • Posts: 2366
Re: MDD silencing effort
« Reply #34 on: November 07, 2017, 08:20:31 AM »
OK urdvurk.... tell the truth, did you used to work for Apple ?  Or do you just design bridges for the government, this thread gets "cooler" every time I read it

Offline torvan

  • Veteran Member
  • ****
  • Posts: 138
  • Old School
Re: MDD silencing effort
« Reply #35 on: November 07, 2017, 11:50:04 AM »

I would love to have a template that I could apply to the side and drill it. I am not exactly handy with a lot of modifications (I refuse to use the popular term "hack") because I am a bit clumsy, but I have a couple test side panels from a "way beyond dead" Quicksilver.

The pattern with measurements is a couple of posts up, but I could make a pdf if you want it. You get the best results using a pillar drill and one of these:


...which will allow you to drill lines and grids of holes much more precisely. I had to use a hand drill on many holes, and it's much more difficult and inaccurate.

Anyway, hope this helps.
[/quote]

I was referring to a file that was the exact size so if I printed it, I could fasten it to the side and fire away at it.  But I also realize what I should really do is create a design of my own since I couldn't really demand a precise template from someone else without compensation for said art.
15 Macs (13 of them ranging from an SE to a MDD), 2 iPads, 2 iPhones, 1 Hackintosh. Small house getting smaller with each Mac. . . . .  .Husband shakes his head but supports my habit.

Offline urdvurk

  • Enthusiast Member
  • ***
  • Posts: 25
  • new to the forums
Re: MDD silencing effort
« Reply #36 on: November 08, 2017, 01:42:07 AM »
That's why I suggested a pdf, I did the drawing in Illustrator on a 1:1 scale, so if you print a pdf made from that at 100% all of the dimensions should be accurate. Anyway, here you go.

A movable vise or cross table will be more accurate, but I'd be interested to see how you get on with a hand drill. If I remember correctly, I did all of the holes at a small diameter first. After drilling everything up to their final diameter I finished the edges with a countersink drill bit, but only on the outside, because the inside of the panel has a layer of silver paint. Countersinking on that side would make the holes look bigger.

You're completely welcome to it by the way - but we do expect pictures of the result.  :D

Offline torvan

  • Veteran Member
  • ****
  • Posts: 138
  • Old School
Re: MDD silencing effort
« Reply #37 on: November 08, 2017, 10:52:48 AM »
Yeah, photos once I get it done. It will take a while though, so do not hold your breath or you will pass out!
15 Macs (13 of them ranging from an SE to a MDD), 2 iPads, 2 iPhones, 1 Hackintosh. Small house getting smaller with each Mac. . . . .  .Husband shakes his head but supports my habit.

Offline smilesdavis

  • Platinum Member
  • *****
  • Posts: 740
  • New Member
Re: MDD silencing effort
« Reply #38 on: August 26, 2022, 10:22:28 PM »
i got one original marathon coming that i will run some current upgrades on

-remove meachanical noise sources like hdds to sdcards, old fans with noctuas and decouple parts with shock absorbers and finally sound insulation
i might even go as far as water cooling . this bad boy is totally silent  by the end of the year
Looking for: Steinberg Cubase MAC Standard/Score v1-5 & Cubase Audio v1, Cubase Audio v2 for, Cubase Audio v3 for DAE/TDM => complete or in parts